Wednesday 4 July 2018

41 Class Stay Alive


This blog covers the installation of a stay alive in a Austrains 41 Class

The ESU say alive is the only commercial product that will fit this engine and requires modification to the hoot to be installed. 

Note: ESU stay alive's only work with a ESU decoder.

It is the easiest to do this with the hood removed. 

To do this remove the handrails installed into the cab sides with a set of small pliers. It is best to leave the factory foam that supports the handrail for this whole process.

The cab  body is secured by six [6] clips - break the lugs that engage the hood as it is impossible to release all of them at the same time. Using a screwdriver disengage the lugs in the running board by pushing along the board then down - not easy.

With the four [4] lugs push / pull the cab off - it is tight so care mixed with force is required. Once removed dress the side of the cab where it rubs in the hood to open up the clearance a little - a few wipes with a flat jewellers file will do the job.

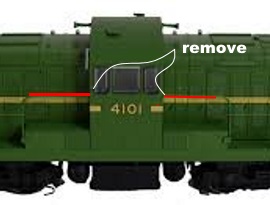
Enlarge the slot in the hood to take the stay alive as shown

Note: Remove the capacitor from the board taking note of which side the negative is marked by the stripe on the side of the capacitor, this is the negative side.

Solder a red and black wire to the capacitor to keep track of the positive / negative and reinstall on the board - tape to the engine on the opposite side to the decoder

Test and reassemble.

Wheel Cleaning


This blog cover the importance of cleaning wheels especially on a new locomotive

The loco shown is a Austrains 41 class that has been converted to sound at the shop. When unpacked it had traces of oil around each bogie especially on the base - this was cleaned up and then the decoder installed.

During testing it ran at best, erratically

The pickups were checked and all looked OK so Conducta Lube was added with some slight improvement but still not good for a sound locomotive. Marcus suggested that I clean the wheels and I did not personally believe it would help but at least it would no hinder.

A piece of a Chucks Super wipe was sprayed liberally with WD-40 and the locomotive was run at a intermediate speed with one bogie on the cloth then repeated for the other side. Not a lot showed up on the cloth but the improvement was dramatic.

This also could be because the WD-40 is a contact wetter and is generally creates excellent results after cleaning track and the excess film of factory oil was removed - yes squeaky clean track and oil is not good for pick.

Only use WD-40 not the cheap after market rubbish.

Sunday 1 July 2018

41 Class Diesel

AUSTRAINS 41 Class

Remove loco from its packaging. On both ends of the loco, you will see the smoke stacks (4 in total). Carefully remove these from the body by gently pulling them vertically off. They have small pins at the bottom which engage into the body- be careful not to bend the pipes otherwise they may break. 


As they stick up above the roof line and may be damaged during the removal of the body.


Easily lost - use 0.012' CMA wire to replace

Using a pair of tweezers, you now need to remove the coupler release bar from the coupler boxes. There is one at each end. Carefully lift the bar out of the bottom of the coupler box, and remove the other end from the frame. Once this is done, unscrew the screw holding the coupler and coupler box and remove.


Beside the fuel tank, on opposite corners, you will find two screws. These need to be removed. Once this is done carefully lift the body off the frame. It should lift straight off. Do not pull the frame by the fuel tank. 

Remove the body and set aside. 

You will find at one end of the loco the 8-pin DC plug remove to begin install.


Using a soldering iron with a small tip you need to unsolder the two speaker wires from the speaker pads beside the 8-Pin plug (shown by the arrow). Then, solder these two wires to the two Brown wires from the sound decoder. Wrap these solder joints in tape to protect them or use some fine heat shrink tube.


Using a Loksound Select, fit the decoder to the loco. NOTE: The Orange Wire/Pin is Pin 1 and the decoder should be plugged in so the Orange Wire/Pin is in the socket where the arrow is (shown by the arrow above).

Note: The 8-Pin plug from the decoder is facing the wrong way in the picture. Make sure the Orange wire corresponds with the arrow pin (shown in the photo on the previous page).

Make sure all wires are taped down and not loose. Also check the black and red wires on the loco they have guide holes in the PCB board where they run through, make sure they are still sitting in these guides. 

See the attached photo to double check, failure to do this may damage the wires when you try to put the body back on.


TEST RUN THE LOCOMOTIVE AND SET ADDRESS USING 
PROGRAM ON MAIN

Re-fit the locomotive body and screw the body to the frame with the two screws on the diagonal of the fuel tank. 

Re-fit the couplers and boxes, as well as the coupler release bar

Re-attach the smoke stacks to the body top

With a Loksound you will also need to press F8 to engage the prime mover sounds.

With thanks to Ben Small.